Installing two operating systems on one computer. How to install two operating systems on one computer Installing 2 windows 7 on one computer
Hello friends! Today you will find a very interesting article. In it we Let's install a second hidden operating system on our laptop!Under what circumstances can it be useful to us. For example, you have a computer at work and several people use it, but even if each user has their own password-protected account, then, if desired, the files of all users can be viewed and copied. We will install the second operating system (Windows 10) on a VHD virtual disk, and create a bootloader on a USB flash drive, after which we will make the virtual disk file hidden. As a result, even a sophisticated PC user will not be able to guess about the existence of a second Windows, because nothing has changed on the computer, the bootloader is as it was for one OS , and remained, and the partitions with the files of the new Windows on the hard disk did not increase.If your colleagues are not particularly versed in computer intricacies, then they will never find a second Windows.You can make things even more interesting if you have a portable USB drive, then the system bootloader, as well as the fileVHD can be located on this disk and carried with you.
How to install a second hidden operating system on a computer or laptop
So, we have a new laptop with UEFI enabled and Windows 10 installed on a GPT disk.
First of all, open Disk Management.
The laptop hard drive is divided into two partitions: (C:) and (D:). Windows 10 is installed naturally on (C:).

Create VHD virtual disk.
"Action" --> "Create a virtual hard disk"

Select the characteristics of the VHD virtual disk.
The size of the virtual hard disk I will choose is 30 GB.
The type of virtual disk can be selected - " fixed size(recommended) ”, but in this case the virtual disk file will immediately occupy the volume on the HDD that you specified when creating it - 30 GB.
Select type - "Dynamic Expandable", in my opinion, is more preferable, because its size will increase as it is filled with data.
Click "Browse"

Select a location to save the virtual hard disk. I will select drive (D:). I assign a name to the virtual disk - "Win10" and press the "Save" button. 

Created VHD virtual disk named "Win10" is on disk (D:) And in Disk Management is unallocated space.

Right-click on the VHD virtual disk (Disk 1) and select "Initialize Disk"

Check the item - "Master Boot Record MBR" and click "OK"

After initializing the disk, we create a simple volume on the unallocated space.


A new volume (E:) has been created.

Now we download it on the official Microsoft website and place it on disk (D :).

Double-click on the Windows 10 build 1607.iso image and attach it to the virtual drive (in my case (F :)).

We just need to unzip the contents of the Windows 10 build 1607 ISO image to a virtual drive (New Volume (E:)).
As you already know, the install.esd archive of the Windows 10 ISO image can contain several other images (Image) releases.

Find out the indexes of all releases. Let's enter the command:
DISM /Get-WimInfo /WimFile:F:\sources\install.esd(where F: is the letter of the virtual drive containing the Windows 10 files, the sources folder, and the install.esd file).
To install to a virtual drive, I need Windows 10 Pro (image index 1).

With the following command, I deploy the install.esd file (Windows 10 Pro) to the virtual disk VHD (partition E:)
Dism /apply-image /imagefile:F:\sources\install.esd /index:1 /ApplyDir:E :\
Windows 10 deployed to virtual disk section (E:) and n it remains only to create for her flash drive bootloader.


We connect the flash drive (drive letter G :) to our laptop and format it into the FAT32 file system.


I want the Windows 10 installed on the virtual drive to boot in both Legacy and UEFI mode, since Windows 8.1 and Windows 10 have 2 startup files: Winload.exe - for MBR bootloader in Legacy mode And Winload.efi - for GPT bootloader in UEFI mode.
To do this, be sure to format the USB flash drive in FAT32 and doflash drive partition active.

The flash drive may not have the required MBR code, so
open a command prompt as administrator and enter the following command:bootsect /nt60 G: /mbr (where G: - the letter of our flash drive).
Disk Boot Code Updated Successfully

Create a bootloader on a flash drive with the command:
bcdboot E:\windows /s G: /f all
(which means - create a bootloader for Windows 10 located on a virtual drive (E:) and place this bootloader on a flash drive, drive letter (G:)),
parameter /f all stands for - including download files for a UEFI or BIOS computer!

Friends, as a result of our actions, on a flash drive ( drive letter (G:)) created bootloaderfor Windows 10 located on the disk (E:). If we go to the flash drive,then we will see the folder EFI\Microsoft\Boot with boot configuration files (BCD), among which is the Windows 10 bootloader file (BCD).

Let's see the contents of the Boot Configuration Data (BCD) file. Open an administrator command prompt and enter the command:
(where G the letter of our flash drive). As you can see, the UEFI bootloader was created on a flash drive (G :) for Windows 10 located on a virtual disk(section E:).
C:\Windows\system32>bcdedit -store G:\efi\microsoft\boot\bcd
Windows Boot Manager
--------------------
identifier (bootmgr)
device partition=G:
path \EFI\Microsoft\Boot\bootmgfw.efi

We can also see the contents of the bootloader of Windows 10, in which we are currently working. We enter the command:
bcdedit
and make sure that the bootloader for the main Windows 10 installed on the drive (C :) is not affected by our actions and is located on the hidden partition 2 (Encrypted (EFI) system partition)
partition=\Device\HarddiskVolume2


We reboot the laptop and enter the boot menu. We choose to download our USB flash drive with the bootloader.

The final stage begins.


Windows 10 installed.

In "Disk Management" we see that Windows 10 is installed on a VHD virtual disk.

If desired, the VHD virtual disk can be made hidden and will not be visible in Windows Explorer.
The latest operating system from Microsoft Windows 7 gained a lot of both admirers and opponents. But she left practically no one indifferent. At the same time, almost everyone who dealt with it, at first, had to face various problems due to incompatibility of programs, and many had a desire to return to the "good old" XP. But not everyone is in a hurry to part with the new system. And so many users feel the need to have two operating systems on one computer at once, so that they can use them in turn, switching between them as needed. But since Windows 7- the system is new, then sometimes there are some difficulties when trying to create a multi-boot configuration (and you still need to know how to do it correctly). And if you are among those users who, after installation Windows 7, still need XP, then this article is for you.
So let's go.
ATTENTION. Let's start with a warning. If there is any data stored on your hard drive that needs to be saved, then in further instructions, in the parts regarding repartitioning the disk into partitions, you will need to make small adjustments, since they are designed for a blank hard drive that does not contain any information, or stores data that can be deleted. If the existing information needs to be saved, then we HIGHLY recommend that you take care of repartitioning the hard disk even BEFORE you start installing operating systems. And use any advanced third-party programs for this purpose, for example, (paid program). Or use some Live-CD with Linux (for example,) - almost all of them have a program GParted(free, more powerful than the utility from Acronis, but often works more slowly). In any of these programs, you need to create two empty MAIN partitions formatted in NTFS. These partitions should be at the beginning of the disk (on the left in the graphics card in the indicated programs), and the partition with the data to be saved should be moved to the right - closer to the end of the disk. We will install operating systems into these 2 partitions - they will become, respectively, disks C and D. And then, during installation, they DO NOT need to be touched anymore - neither repartition, nor format - just install each of the operating systems in the partition prepared for it.
Well, now the installation itself.
Configuring the order of checking boot devices
We go into the BIOS settings in the section Advanced and looking for an item Boot Device Priority. Here it is necessary to install the optical drive as the first boot device (First Device), and the hard drive as the second. This is necessary so that when you reboot, you can start the computer from the boot disk and get into its menu. Save the configuration by clicking Save & Exit in the main BIOS menu (or by pressing F10 followed by the answer to the question with the key Y).
If your BIOS version is slightly different, then you will have to look for the desired section by analogy. Focus on the word "Boot" ("Download").
ATTENTION. The BIOS is categorically NOT intended for "crazy hands". Therefore, you should not touch anything there without a clear understanding of what you are doing! This is exactly the case when it is better to think seven times and break once.
The first step can be skipped if your computer itself can read a disk that has long been forgotten in the drive when it reboots. This can usually be determined if, when you start Windows, the disk in the drive itself starts to spin up.
Starting the installation of Windows XP
Looking ahead, I will say that first we will install Windows XP. Not vice versa, but first XP! Therefore, we insert the installation disk with this operating system, and restart the computer. If suddenly, when loading, we see an inscription of white letters, something like " Press any key to boot from CD...", then, without hesitation, immediately press any key on the keyboard. This is how we will start the boot from this installation disk. While the inscription is on, you will have 5 seconds to press any key. If you do not have time, the computer will start from the hard disk, and the XP installation won't start, you'll have to reboot again.
Each system has its own section
As mentioned above, before installation, two partitions must be allocated on the computer's hard drive. As you navigate through the installer dialog boxes, you will be prompted to select a partition to install the operating system. Ignore this and create partitions on our own, after deleting all old partitions by pressing the key D, and then create new ones in their place by pressing the key C, and specifying the size of the first section we need (in megabytes). This will be partition C. Next, we have an unallocated area of \u200b\u200bthe disk - select it and press the key again C, and without really delving into the details of events, we immediately press ENTER(because we don't need to change the size of the second partition). So we get partition D. Although, if the size of the hard drive is quite large, then it makes sense to allocate some specific volume for disk D, and leave all the remaining space unallocated - you will deal with it later, creating partitions on it according to your needs.
ATTENTION. The above procedures are for a blank hard disk that has no data, because deleting partitions will make all information disappear. If there is data on the hard drive that needs to be saved, then it is IMPOSSIBLE to carry out these gestures. Go back to the beginning of the article and create, as described there, two clean main partitions using special programs, and only then proceed to install operating systems, without repartitioning or formatting anything, but simply install each OS into the partition prepared for it.
Installing Windows XP to Partition D
After all the manipulations with the hard disk partitions, we proceed to the installation itself, specifying partition D as the place for Windows XP. Exactly so, and not otherwise, so that in the future there will be no problems with choosing and loading the desired operating system. After that, we carry out the installation to the end as usual.
Note. We installed Windows XP on drive D. It will be located there and will work from it, but its boot files, that is, the files that run it, will still be located on drive C. And if drive C is formatted or in any way corrupted (along with these download files), then you will lose the ability to download Windows XP. Although the system itself may be in perfect order, there will be nothing to start it.
Windows XP boot files are:
- Ntldr
- Boot.ini
- NTDetect.com
They are located in the root directory of drive C (hidden files, service files - turn on their display). You can copy them to a safe place, and if you suddenly need them, it will be easy to restore them from a backup and manually return them to drive C, thus restoring Windows XP boot again.
Installing Windows 7 next
After Windows XP established, it's time to approach Windows 7. We act by analogy with the previous operating system - insert the installation disk Windows 7, restart the computer and press any button while the inscription appears (most likely: " Press any key to boot from CD...").
Selecting a partition for installation
Now select partition C and install Windows 7 into it. DO NOT FORMAT!!!
All! We have a multiboot configuration ready.
Now, when you turn on or restart your computer, two lines will appear on your screen, the first - “ Previous version of Windows ” and the second - “ Windows 7 ". You can select any of them using the arrow keys on your keyboard and press ENTER- The selected operating system will start loading. If you don’t press anything for 30 seconds, then the default system will start - if you haven’t changed anything, then it will be Windows 7.
If you want to change the default boot operating system or delay time, then go to Windows 7, next button Start => Control Panel => System => Advanced System Settings(left) => button "".
Good day to all!
Most modern laptops come preloaded with Windows 10 (8). But from experience I can say that many users (so far) like and are comfortable working in Windows 7 (some people don't run old software on Windows 10, others don't like the design of the new OS, others have problems with fonts, drivers, etc.).
But in order to run Windows 7 on a laptop, it is not necessary to format the disk, delete everything on it, etc. You can do it differently - install Windows 7 as a second OS to an existing 10-ke (for example). This is done quite simply, although many have difficulties. In this article, I will show with an example how to install a second Windows 7 OS to Windows 10 on a laptop with a GPT disk (under UEFI). So, let's start sorting out in order ...
How to make two from one disk partition (we make a partition for installing a second Windows)
In most cases (I don’t know why), all new laptops (and computers) come with one partition - on which Windows is installed. Firstly, this partitioning method is not very convenient (especially in emergency cases when you need to change the OS); secondly, if you want to install a second OS, then there will be nowhere to do it ...
The task in this subsection of the article is simple: without deleting data on the partition with Windows 10 (8) preinstalled, make another 40-50GB partition (for example) from the free space for installing Windows 7 into it.
In principle, there is nothing complicated here, especially since you can get by with the utilities built into Windows. Let's consider all the actions in order.
1) Open the utility " Disk Management"- it is available in any version of Windows: 7, 8, 10. The easiest way to do this is to press the buttons Win+R and enter the command , press ENTER .

2) We select our disk partition on which there is free space (I have 2 partitions in the screenshot below, on a new laptop, most likely, there will be 1). So, select this section, right-click on it and in the context menu, click "" (i.e. we will reduce it due to the free space on it).

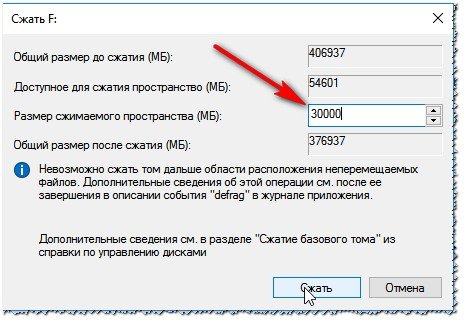
3) Next, enter the size of the compressible space in MB (for Windows 7, I recommend a minimum 30-50GB partition, i.e. at least 30,000 MB, see the screenshot below). Those. in fact, we are now entering the size of the disk on which we will later install Windows.
4) Actually, in a couple of minutes you will see that the free space (the size of which we indicated) was separated from the disk and became unallocated (in disk management - such areas are marked in black).
Now right-click on this unallocated area and create a simple volume there.

5) Next, you will need to specify the file system (choose NTFS) and specify the drive letter (you can specify any that is not yet in the system). I think that it’s not worth illustrating all these steps here, just press the “next” button a couple of times there.
Then your disk will be ready and you can write other files to it, including installing another OS.
Important! Also, to split one hard disk partition into 2-3 parts, you can use special utilities. Be careful, not all of them break the hard drive without damaging the files! I talked about one of the programs (which does not format the disk and does not delete your data on it during such an operation) in this article:
Create a bootable UEFI flash drive with Windows 7
By the way, you can find out what markup is on your disk (MBR or GPT) in this article: . The layout of your disk determines the settings that you need to set when creating bootable media!
For this case, I propose to use one of the most convenient and simple utilities for recording bootable flash drives. We are talking about the Rufus utility.
![]()
Quite a small (by the way, free) utility for creating bootable media. Using it is extremely simple: just download, run, specify the image and set the settings. Further - she will do everything herself! Just an ideal and a good example for utilities of this kind ...
Let's move on to the recording settings (in order):
- Device : Specify the flash drive here. to which the ISO image file with Windows 7 will be written (a flash drive will be needed for at least 4 GB, better - 8 GB);
- Partition scheme: GPT for computers with UEFI interface (this is an important setting, otherwise you won't be able to start the installation!);
- File system: FAT32;
- then specify the boot image file with Windows 7 (check the settings so that they are not reset. Some parameters may change after specifying the ISO image);
- Press the start button and wait for the end of the recording process.

Setting up the laptop BIOS (disabling Secure Boot)
The fact is that if you plan to install Windows 7 as a second system, then this cannot be done unless Secure boot is disabled in the laptop's BIOS.
Secure boot is a UEFI feature that prevents unauthorized operating systems and software from running when the computer is turned on and started. Those. roughly speaking, it protects against everything unfamiliar, for example, from viruses ...
In different laptops, Secure Boot is disabled in different ways (there are laptops where it cannot be disabled at all!). Let's consider the issue in more detail.
1) First you need to enter the BIOS. For this, most often, the keys are used: F2, F10, Delete. Each laptop manufacturer (and even laptops of the same model range) has different buttons! The login button must be pressed several times immediately after turning on the device.
Remarque! Buttons for entering the BIOS for different PCs, laptops:
2) When you enter the BIOS - look for the BOOT section. In it you need to do the following (using the example of a Dell laptop):
- Boot List Option - UEFI;
- Secure Boot - Disabled (disabled! Without this, you won't be able to install Windows 7);
- Load Legacy Option Rom - Enabled (support for loading older operating systems);
- The rest can be left as is, by default;
- Press the F10 (Save and Exit) button - this is to save and exit (at the bottom of the screen you will have the buttons that you need to press).

Secure Boot is disabled.
Remarque! You can read more about disabling Secure Boot in this article (several different laptops are discussed there):
Starting Windows 7 Setup
If the flash drive is written and inserted into the USB 2.0 port (the USB 3.0 port is marked in blue, be careful), the BIOS is configured, then you can start installing Windows 7 ...
1) Reboot (turn on) the laptop and press the boot media selection button (Call Boot Menu). These buttons are different on different laptops. For example, on HP laptops you can press ESC (or F10), on Dell laptops - F12. In general, there is nothing complicated here, you can even experimentally find the most frequent buttons: ESC, F2, F10, F12 ...
Remarque! Hotkeys for calling the Boot Menu in laptops from different manufacturers:
By the way, you can also select bootable media in the BIOS (see the previous part of the article), correctly setting the queue.
The screenshot below shows what such a menu looks like. When it appears, select the created bootable USB flash drive (see screenshot below).

2) Next, the usual installation of Windows 7 will start: a welcome window, a window with a license (need to be confirmed), a choice of installation type (choose for advanced users) and, finally, a window will appear with a choice of disk on which to install the OS. In principle, there should not be any errors at this step - you need to select the disk partition that we prepared in advance and click " next«.

Where to install Windows 7.
Remarque! If there are errors, like “this partition cannot be installed, because it is MBR ... "- I recommend that you read this article:
3) Then all that remains is to wait until the files are copied to the laptop's hard drive, prepared, updated, etc.

4) By the way, if after the files are copied (screen above) and the laptop is rebooted, you will see the error “File: \Windows\System32\Winload.efi”, etc. (screenshot below) - so you did not turn off Secure Boot and Windows cannot continue the installation ...
After disabling Secure Boot (how to do this - see above in the article) - there will be no such error and Windows will continue the installation in the normal mode.

Secure Boot Related Error - Not Off!
Default system selection, timeout setting
After installing the second Windows system - when you turn on the computer, you will have a boot manager that will display all the available OS on the computer to let you choose what to download (screenshot below).
In principle, this could be the end of the article - but the default parameters are painfully inconvenient. First, this screen appears every time for 30 seconds. (5 are enough to choose from!), secondly, as a rule, each user wants to choose which system to boot by default. Actually, this is what we will do now ...

To set the time and select the default system, go to the Windows Control Panel at: Control Panel/System and Security/System(I set these parameters in Windows 7, but in Windows 8/10 - this is done the same way!).
When the "System" window opens, there will be a link on the left side " Additional system settings"- it needs to be opened (screenshot below).

Control Panel/System and Security/System/Options options

Next, you can select the operating system that is loaded by default, as well as whether to display the OS list, and how long it actually displays. (screenshot below). In general, set the parameters for yourself, save them and restart the laptop.

PS
With this, the modest mission of this article is completed. Results: the laptop has 2 OS installed, both work, when you turn it on, you have 6 seconds to choose what to download. Windows 7 is used for a couple of old applications that refused to work in Windows 10 (although virtual machines could have been enough :)), and Windows 10 for everything else. Both operating systems see all disks in the system, you can work with the same files, etc.
This article provides step-by-step instructions on how to install Windows 7 on a second system.
This method is suitable if you want to install Windows 7 in addition to an existing operating system (OS) of the Windows family, such as Windows Vista or Windows XP. The correct order for installing two operating systems on one computer is as follows: the earlier one is installed first (Windows XP, Windows Vista, etc.), then the later one (Windows 7). In this case, after installing Windows 7, a boot menu is automatically created (a menu for choosing which of the 2 OS to boot).
Minimum system requirements
First of all, make sure your computer meets the minimum requirements:
- Processor: 1 GHz, 32-bit or 64-bit
- RAM: 1 GB (32-bit) / 2 GB (64-bit)
- Free disk space: 16 GB (32-bit) / 20 GB (64-bit)
- Video adapter: DirectX 9 graphics support, 128 MB memory (to enable the Aero theme)
- DVD Reader / USB Flash Drive
- Internet connection (for downloading beta and updates)
Media preparation
If you have a disk with Windows 7 - go to.
If you have downloaded the image - read on.
Installation can be done:
Burning an image to a USB Flash (flash drive) or DVD
There are many ways to record, here are a few of them for you to choose from:
Unpacking the image to a hard disk (HDD)
To unpack the image, I suggest using a program or any other, to your taste.
Download the distribution, install, run, click "Open", specify the path to the image:
Choose "Actions" -> "Extract", specify the folder to extract:

Preparing the hard disk partition for installation
It is advisable to transfer all important information from it and format it (during the installation process).
In order not to get confused, you can set the volume label in advance:

Installation
Boot into an existing OS, insert a disk (or flash drive) or navigate to the desired folder on the HDD.
Run "setup.exe":

If you have an Internet connection, it is advisable to get the latest updates:
We read the License Agreement, if you agree - check the box and click "Further":
Choose "Full installation":
Select the desired section and click "Disk Setup":
We press "Format"(preferred but not required)
Attention, all data on the selected partition will be deleted!
The machine will reboot and the installation will continue.
Question from user
Hello.
Can I install several different Windows on one computer so that both work? The thing is, I need to run one old program to do the lab. This program only runs on Windows 98/2000 and possibly 95 (on Windows 7, 10 it won't run).
What is the best way to do this?
Good day!
The question about the simultaneous operation of the OS is not completely clear. Nevertheless, I decided to put it in a whole article, because. The theme itself is quite popular.
In general, this problem can be solved in at least two ways: use a virtual machine and run almost any OS; create another partition on your disk and install new Windows into it. In the article I will consider both of these options, and also point out the features (pluses / minuses) of each.
Option number 1: using a virtual machine (one OS will run in another OS)
Pros: you can install a dozen (or more) of a wide variety of operating systems; good compatibility (you can run Windows 20 years ago on a modern PC); you can easily and quickly transfer a virtual machine (with all its data) from one PC to another; you can run several systems at the same time (it all depends on your amount of RAM).
Cons: no 100% virtualization (some software may refuse to run on a virtual machine); you can't (usually) work directly with the hard drive (i.e., first you need to transfer the files to the disk of the virtual machine, and after that, it is possible to work with them).
In fact, a virtual machine is a regular program that emulates the operation of a computer. By installing it on your PC, you can run the version of Windows you need as a regular program (see screenshot below).

Windows 10 is running Windows XP (and you can already run many old games and applications on Windows XP)

Running the old game Doom 2 on the new Windows 10 (using a virtual machine) // as an example
Option #2: You can install another Windows on your hard drive
Pros: it will be a full OS (you can run almost any software); you can work with all connected drives to the system; in each OS you can install a full-fledged antivirus (so your files on the drives can be scanned by various antivirus software).
Cons: not every "old" Windows OS can be installed on a PC (lack of drivers, no support for new interfaces, etc.); old Windows OS often overwrite the bootloader during installation (there may be a problem with choosing the Windows OS to boot).
In general, Windows 7 (8) is most often paired with Windows 10 on a modern PC. With the installation of Windows XP (2000 and below), as a rule, problems arise: they do not see the HDD, there are no drivers for them, etc. (By the way, manufacturers even stop releasing drivers for Windows 7/8 for modern laptops...) .
Below I will consider step by step all the steps that are usually required to install a second system on a new PC / laptop.
Step 1: create a partition for the system
As a rule, on new computers there is one single partition "C: \" with Windows 10 installed on it. An example from "My Computer" is on the screen below (don't pay attention to the used disk space yet) .

Initial task: create another disk partition of 40-50 GB (at least), which is enough to install another system (and you need to install the system on another partition - 2 systems cannot be installed on one disk "C:\"!) .
This operation can be done very quickly (without data loss). The main thing is that you have free space on the disk (in the amount that you want to give to the new partition).
Let's say if you want to make another 50 GB partition (partition "D:/"), you must have at least 50 GB free on the "C:/" drive. Those. in fact, we will simply "cut off" the free space from one partition, and give it to another partition.

How to do it without data loss:

To help!
(for those who have unexplained points about the above)
Detailed instructions for partitioning a hard drive -
Step 2: Prepare bootable media
- use ISO images with one system (and one bit depth) to create an installation flash drive. For example, an unfortunate choice: "Windows 7 5 in 1 x32+x64" (preferably "Windows 7 x64 Pro") .
In order not to repeat myself here, just below I will give a couple of links to instructions for creating a bootable USB flash drive.
Please note that for a new PC, you will most likely have to go with "UEFI GPT" (or, if BIOS settings allow, disable "Secure Boot" and enable Legacy compatibility mode) . The settings depend on this when creating the installation flash drive (by the way, before creating bootable media, it will not be superfluous to go into the BIOS and see if you can disable Secure Boot and enable Legacy (See the section below for more on this) ).
Creating a bootable USB flash drive for installing Windows XP, 7, 8, 10 (UEFI and Legacy) -
How to create a bootable UEFI GPT flash drive with Windows 10, or why errors occur when installing the system on a new laptop (PC) -
Step 3: BIOS setup (disabling Secure Boot for Windows 7 and below)
On new PCs (laptops), without exception, the BIOS (or its newer UEFI version) has a new protection function - secure boot(secure boot, by the way, is enabled by default). Everything would be fine, but only new Windows 8/10 operating systems support this boot mode (and, by the way, a flash drive for this mode needs to be written a little differently, a little higher I gave a couple of links to instructions) .
If you burned a flash drive in the usual way, or you are going to install Windows 7 (and below), you need to enter the BIOS and:
- disable mode secure boot ;
- enable support for booting "old" OS: option Legacy or CSM(look in the sections Boot, Security).
Below is a photo of the BIOS settings of the BOOT section (classic Dell laptop). Pay attention to the lines "Boot List Option" and "Secure Boot". In general, everything is brought into the mode of operation, as mentioned above ...

If you have a more modern device with UEFI, then everything is about the same here. In the BOOT section, you need to enable support for "old" OS - "Csm Support" set to "Enable" mode (see photo below).

Then, in the SECURITY section, you can put "Secure Boot Control" in the "Disabled" mode (turned off). By the way, do not forget to save the changed parameters (key F10, or the exit option "Save and Exit").

Step 4: Install Windows OS
Installing modern operating systems (if the BIOS is correctly configured and bootable media is correctly written) is not difficult. After starting the installation, you will see a step-by-step wizard: the main thing you need to specify is to select a partition for installing the system (of course, you need to select the section that we created in the first step) .
I will give below a few instructions in which the installation of the OS is disassembled step by step. I think that these materials are more than enough for this task.
How to install Windows 7 on a new laptop (for example, Lenovo B70) -
How to install Windows 10 on an Asus ZenBook laptop (using the UX310UA model as an example) -
Installing Windows 10 from a flash drive - step by step (universal instructions) -
Step 5: Setting the Default OS Boot
After installing the second OS, by default, when you turn on and boot your PC (laptop), you should see a menu with a choice of OS. The screenshot below shows how I implemented it (by the way, you are given 30 seconds of time so that you can choose which OS you need to boot).

To change 30 sec. for a shorter time (and specify which OS to boot by default), you must:

Actually, that's all. Additions and comments are welcome.
By the way, many people buy a used laptop for old programs / games and install Windows 2000 / XP on it. There are a lot of old laptops on the market now and you can buy them for "mere pennies", and help in solving laboratory problems, working with "capricious" software - they can be invaluable!
To help!
I want to buy a used laptop: how to check it and what to look for -
Successful work!