How to set up channels on an old Thomson TV. How to Tune Channels on an Old Thomson TV
Hi all! Today I am reviewing a Smart-TV from THOMSON. I remember well the times when it was simply physically impossible to buy a TV; they simply weren’t on sale. Living in Vladivostok, you could get hold of a TV through thrift stores, where these same TVs came from Japan. Today, of course, there are no problems with buying a TV, the problem lies elsewhere, there is a very large selection and sometimes making the right decision is very difficult.
ABOUT THOMSON
1914 is the year of founding of the Thomson SA (Thomson Multimedia) group of companies, named after the founder of the joint American-French company, electrical engineer Elihu Thomson.
Thomson is one of the oldest and most recognizable brands in the global electronics industry, where it has been the standard of quality and synonymous with reliability for more than 100 years.
Thomson is the epitome of design, style, comfort, ease of use, durability and affordable prices.
Thomson today is not only high-tech television equipment, but also a wide range of various electrical household products - digital set-top boxes, audio/video equipment, phones, monitors, tablet PCs, household appliances and accessories.
PACKAGE
The TV comes in a box made of glossy gray cardboard. The packaging contains a colorful image of the TV itself, indicating the main advantages of the product.

There are handles at the ends for carrying.

The box is packed with branded tape, so it will be immediately clear whether the box has been opened before you or not.

A small sticker at the bottom of the package states that the TV was manufactured in Russia in early summer 2017.

Inside the box, the TV is packed in a foam frame. Popular wisdom says that if a “cat” sits on a box with a TV, then it will work for a VERY long time!

EQUIPMENT
Here's what's included in the package:

1. TV.
2. Remote control.
3. User manual.
4. Warranty card.
5. Instructions for installing the stand.
6. Power cable.
7. Self-tapping screws – 4 pcs.
8. AAA batteries – 2 pcs.
9. Two TV legs.
10. Adapter (adapter).
Standard delivery set. A plus is the removable power cable.
SPECIFICATIONS
TV type - LED TV.
Model - Thomson T32RTM5040.
Frame color is black.
Stand color – grey.
Screen diagonal - 32" (81 cm).
Screen resolution - 1366x768 (HD).
Screen format - 16:9.
HDTV standard is HD 720p.
Screen refresh rate - 50 Hz.
Brightness - 330 cd/m².
Contrast - 3000:1.
Viewing angle - 178° / 178°.
Smart TV support – yes.
Wi-Fi – built-in.
Digital tuners - DVB-T, DVB-T2, DVB-C.
Teletext – yes.
Sound power – 2x5 W.
Surround sound – yes.
Playback from external media – yes.
Supported media: USB.
Main video files and codecs - MPEG4, Xvid, DivX, MKV, AVI, MPEG2, TS, VOB, MPEG1, FLV, H.264, VC-1.
Main audio files and codecs - MP3, AAC.
Main graphic files - JPEG, BMP, PNG.
Number of HDMI ports – 2.
Other audio/video inputs are composite AV, antenna input, satellite input.
Headphone output – yes.
Other audio/video outputs are S/PDIF audio (coaxial).
Number of USB ports – 2.
Slot for CI/PCMCIA – yes.
Other ports and interfaces are Ethernet (RJ-45).
DLNA support – yes.
HDMI CEC – yes.
TimeShift function - yes.
Video recording – yes.
There is a possibility of wall mounting.
VESA size - 200x100.
Width without stand - 733 mm.
Height without stand - 440 mm.
Thickness without stand - 77 mm.
Weight without stand - 4.47 kg.
Width with stand - 733 mm.
Height with stand - 468 mm.
Thickness with stand - 165 mm.
Weight with stand - 4.6 kg.
INSTALLING THE STAND
Of course, the first thing we do after purchasing a TV is install the stand included in the package.
To install the fasteners, you can use the included instructions, but the installation itself is so simple that instructions are simply not needed.
The stand is presented in the form of two silver aluminum legs, which are attached using four self-tapping screws from the delivery set.
It is impossible to install the mounts incorrectly, since the TV itself has special grooves only for the left or only for the right stand.
 |  |  |
The holes for the self-tapping screws on one of the stands are not processed very carefully.

The TV legs are positioned slightly at an angle, the stability is good, and you won’t be able to accidentally knock over the TV.


The legs have silicone inserts that prevent the TV from sliding on a flat surface.

After installing the legs, the distance between the bottom of the TV and the surface is 4 cm.

APPEARANCE
I have 42" (FullHD) and 49" (4k) TVs at home. After them, a TV from THOMSON seems like just a baby, the eye gets used to the large size and anything smaller already seems small.
And this is what TVs look like in comparison.
 |  |  |  |  |  |
In terms of design, the TV does not represent anything new or interesting. An ordinary TV in a classic style, like everyone else. Nowadays, none of the manufacturers particularly bother with appearance. And it’s quite difficult to surprise the average consumer with something new. Only very expensive models have at least some style or design. The mass segment looks like a carbon copy.

The TV body is made of black matte plastic.

The screen frames are quite narrow, the widest part of the frame is at the bottom, where the manufacturer’s logo is also located. In general, the trend now is for narrow frames, even in budget models. There is a silver plastic insert at the bottom of the screen.

A TV can be called narrow. Yes, it is narrow, but only at the very top.


In the middle part on the back side all the filling of the TV is hidden, it turns out to be a kind of hump. There is also a place for VESA - 200x100 mount.

Please note that the bolt slots protrude quite significantly beyond the body.

There are ventilation holes at the top of the protrusion.

At the very bottom of the TV there are two stereo speakers, which is why the bottom part is wide. The speakers are downward facing, so if the TV is placed on a table, the sound will be reflected from the surface.


The TV control buttons are located on the back side and this is very inconvenient, since all actions have to be done by touch. With this button you can only switch channels, adjust the volume and select the connection type. But all other functionality becomes unavailable. If you lose the remote control or it breaks, the TV will turn into a pumpkin. But there is a way out of this situation; you will need to download the application to your smartphone and control the TV through your smartphone.


Various connection ports are located at the bottom of the protruding element and on the left side.

1. Connector for connecting the power cable.
2. Ethernet port.
3. Headphone jack with 3.5 mm TRS plug.
4.AV IN. Video and audio connection connector.
5. HDMI 2 (ARC) connector.
6. HDMI 1 (MHL) connector.
7. RF IN (input). Connector for connecting to an antenna or cable TV.
9. USB 2 (2.0). Output current on connectors is 0.5 A.
10. COMMON INTERFACE (CI). CI+ format CAM module connector.
11. SPDIF (COAXIAL). Digital audio output connector.


There is an LED indicator in the lower right corner that notifies you of your remote control actions in red.

What about the build quality? Visually everything is fine. But a closer look at the case reveals that the plastic is quite cheap and thin. The TV control unit is pressed by hand. The frame of the case in the upper part easily bends from the base. The overall rigidity of the case is low; when pressing in the corners in different directions, the case is deformed.
REMOTE CONTROL
When I first saw the TV remote control, I had something like this expression on my face...

No, are you serious!? Almost 25 cm!!!

Apparently the designer/engineer of this remote control has a little person complex. There is no other way I can explain such a gigantic size of the remote control.
This is the largest remote control in my remote control collection!

Yes, it even looks ridiculous in your hand.


The most important buttons on the remote control have different colors.


There are plastic feet on the back of the remote control.

The buttons on the remote control are rubberized, except for the central navigation keys.
The remote control is slightly curved inward.

An IR transmitter is hidden in the upper part of the remote control under a plastic insert.

To be honest, the remote control is inconvenient to use precisely because of its large size. Some keys are clearly large in size, it would be wiser to make them smaller, and the layout of the buttons themselves could be made more dense.
So if you use the top part of the buttons, the bottom of the remote control outweighs and tends to fall out of your hands, very inconvenient! In some cases, you have to hold the remote control with your second hand. The block of buttons with numbers clearly needs to be placed closer to the center.
But the biggest drawback for me was the very noisy buttons. They press with a pronounced click, like on some push-button phones. Why do this? It's not clear at all! When using the remote control, clicking the buttons is simply annoying, and it is simply impossible to use the remote control in silence. Well, there was no button on the remote control to switch the broadcast from antenna to cable, which seems like a small thing, but it’s unpleasant. As a result, the remote control itself was put away in the box, and control of the TV was transferred to the smartphone.
FIRST SWITCH ON AND SETTINGS
Let's check how long it takes to turn on the TV and change channels, and also compare the readings with TVs from Sony and Toshiba.
Turning on the TV from standby mode:
1.Thomson – 13 sec.
2.Sony – 7 sec.
3.Toshiba – 18 sec.
Switching channels:
1.Thomson – 2.62 sec.
2.Sony – 3.21 sec.
3.Toshiba – 1.97 sec.
When you turn on the TV for the first time, you need to go through a small setup.

The first thing you need to do is select your country of residence and language.

The place where the TV will be used.

Network connection type. I chose Wi-Fi, since the provider and router provide 100 Mbit/s.

When connected, the system will check for a software update. At the time of connection there were no updates. Honestly, I doubt there will be any updates at all, considering the TV was released in the month of July 2017.


You can select the desired channel tuning mode. I set it to automatically search for digital and analogue channels.

As a result, 17 analog and 20 digital channels + 3 radio stations were found.

After setting up channels through the antenna, the system will offer to set up cable broadcasting.

You can configure channels manually, but to be honest, I don’t see any point in this.
There is no point in dwelling on the TV settings as such, everything is described in the attached instructions, and there is also an electronic manual in the TV itself.
As practice shows, when setting up broadcast channels, the remaining functionality of the TV is practically not used.
But it’s still worth mentioning the basic settings parameters.
You can fine-tune the displayed image or use ready-made presets.

The same settings can be applied to the sound part.

You can sort the tuned channels in the order that suits you. Subtitle and teletext functions are available. The TimeShift function allows you to pause the image and then return to viewing.

You can separately configure the Smatr-TV function. But the setting is more cosmetic.

Separate setup of wired or wireless network.

System settings: language, sleep timer, lock, factory reset, etc.

Updating the TV firmware is possible via a wireless network or via removable media.

RECEIVING DIGITAL, ANALOG, CABLE SIGNAL
To receive a digital signal, I bought a DEXP Curve 50 antenna. The antenna itself “caught” both multiplexes, the total is 20 channels + 3 radio stations, which is the maximum figure so far. I didn’t bother too much with installing the antenna; I just threw it near the TV for the test. I live on the ground floor, the house is on a hill, there is no special building in front of the house, the tower is 10 km away. The reception of all channels is excellent. But here, for the most part, it’s not about the TV, but about the quality of your antenna and the building density and distance to the tower.

Example image of all 20 digital channels:
 |  |  |  |  |  |  |  |  |  |  |  |  |  |  |  |  |  |  |  |
We managed to catch 15-17 analog channels (depending on the placement of the antenna). Out of 15 channels, you can watch no more than 3 channels normally, all the rest have interference. In general, analogue broadcasting can be ignored due to poor signal reception. According to rumors, analogue broadcasting will be discontinued in 2018.
An example of broadcasting analogue channels:
 |  |  |  |  |  |  |  |  |  |  |  |  |  |  |
With cable broadcasting, everything is quite individual, much depends on your operator.
I have set up more than 100 broadcast channels, but since I rarely watch TV, this indicator is not interesting to me.
Example of cable TV broadcasting:
 |  |  |  |  |  |  |  |  |
We can say that this TV has no problems with digital reception. It all depends on the chosen antenna and its placement.
Of course, filming with a camera cannot accurately reproduce the image from the TV screen, but visually the best picture was on cable broadcasting. A total of 9999 channels can be stored in the TV memory.
SCREEN
The screen size on our TV is 32 inches or 81 cm diagonally. The resolution is standard in this price range - 1366x768 (HD).
The pixel density with these characteristics is only 49 ppi (dots per inch). From a distance of two meters, individual pixels on the screen are not noticeable.
But from a distance of just over a meter, individual pixels are already clearly visible.

Screen format 16:9. There is no and cannot be support for HDR mode. Screen refresh rate - 50 Hz. The brightness is - 330 cd/m². The stated contrast is 3000:1. Viewing angles 178°. Response time 6.5 ms. The characteristics are quite standard.
Screen backlight technology - Direct LED. The Direct LED backlight type provides for the distribution of LEDs over the entire area of the matrix.
Main advantages:
1. Uniform illumination.
2. Good contrast level.
3. Almost complete absence of highlights at the edges of the matrix
4. Good brightness.
Main disadvantages:
1. High power consumption.
2. The screen matrix may not be the thinnest 3. Large Input Lag.
In general, the level of screen backlighting can be called uniform; there are small highlights only closer to the corners of the screen and then they are visible only against a black background.
 |  |  |
In dynamics, the backlight level looks even and without any flaws.
 |  |  |
Viewing angles are about 178 degrees. In practice, this is approximately how it is. But there is a slight inversion of color shades at different tilt angles. However, the distortions are small and during everyday tasks they are practically unnoticeable.

Let's look at the screen settings in more detail using the ColorMunki Display calibrator from X-Rite.
It’s worth saying right away that the lower the screen resolution, the worse the final result will be.
Gamma curves have a significant scatter from the reference curve.

Color channels are also not stable. The values for the blue color are greatly overestimated.

The color temperature is so high that the measurement readings are not displayed on the graph. In the image settings, I immediately recommend setting the “warm” display mode.

According to the sRGB standard, there is a significant scatter. We can say that the transmission of color shades on the TV screen will not be entirely natural.


In general, the screen shows quite expected characteristics, but it cannot be called bad. Characteristics and factory settings fit into their price group. This screen is more than enough to watch live broadcasts.
SOUND
The TV has two stereo speakers of 5 W each. The DNS website indicates that the TV is equipped with a subwoofer, but there is no such information on the manufacturer’s official website or in the instructions.
To its credit, the volume on the TV is excellent. At maximum volume the speakers do not produce any noise. If you're just watching TV, then just set the volume to +10. At a volume of +50 there is already discomfort. At a volume of +100 it is no longer possible to be near the TV, it is very loud. Peak volume is about 71 dB.
In the sound settings, you can select different sound effects (music, movie, voice, standard, stadium, custom). 5 band equalizer available.
In the sound settings, you can select the type of placement of the TV; it can be a table or a wall. To be honest, I didn’t notice any difference in sound.
There's nothing particularly special about the sound quality. Basically the sound is flat, low frequencies are not felt at all. If you change sound presets, you will feel changes in the sound (the equalizer settings change).
CONNECTING PERIPHERALS
A revelation was the absence of a Bluetooth module on the TV. Considering the cheap cost of the module itself, it is difficult to logically explain its absence.
Yes, and an optical audio output would also be nice, but let’s leave the lyrics aside.
First of all, I decided to check how the TV copes with large-capacity HDDs. It was a pleasant surprise that the TV “sees” HDDs of 2 and 4 TB, and I didn’t even have to format anything. For example, my SONY TV on Android OS does not want to work properly with a HDD larger than 2TB. Surfing through a disk structure with many folders is quite smooth, which is a positive thing.
There were also no problems connecting USB flash drives.
Memory cards can be connected via a regular USB card reader.
Since there is no BT module on the TV, I decided to check how a mouse with its own BT module would work. The connection was successful, a green arrow for navigation appears on the screen. It is noteworthy that the right button on the mouse was responsible for the “OK” action, and the left button canceled the last action. In the TV interface, the actions of the right and left buttons on the mouse worked quite selectively; in some menus, clicking the mouse buttons did not lead to the desired result, and I had to contact the control panel. In the browser, the buttons worked properly, but the ability to scroll pages using the wheel did not work. The wheel in the TV menu also does not work. From all this we can conclude that a wireless mouse is simply useless on this TV.
Connecting a wired mouse does not lead to the desired result at all; the TV simply does not see it.
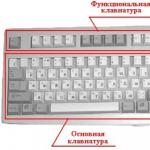
The wired keyboard works. Typing from the keyboard is only possible in English; switching to Russian from the keyboard is not possible. To enter another language, you need to call up the virtual keyboard on the TV and select the desired language in the settings of the keyboard itself. You can select three languages for input at the same time.
The BT keyboard from Microsoft with a dedicated touch panel worked best. Here at least the mouse functionality works, but again input in Russian is only possible through the virtual keyboard.

You can record television broadcasts on any removable media. To do this, press the “rec” key on the remote control. There is no need to format the external media first. You can select any time recording format. Naturally, you can only view the recorded file on the same TV. An advantage is that removable media does not need to be formatted before recording, and thus you will not lose other files on the media itself. A 2-minute recording takes about 50 MB of disk space, which is quite a lot.
A smartphone running Android OS and iOS can act as a remote control. From the app store you need to download an application called “TV Remote”. The smartphone connects to the TV using a Wi-Fi module.

Actually, the application completely duplicates the capabilities of the control panel.

Separately, there is a function for a wireless mouse and text input.

You can also transfer any content from your phone to TV: music, videos, photos.

For example, a video recorded in 4k on a Samsung Galaxy S8+ smartphone refused to be broadcast on the TV screen. Problems are also observed in FullHD format at 60 fps, the video is constantly loaded, the sound is delayed - it is impossible to watch. Normal video broadcasting is only possible in 720p (HD).
The TV supports DLNA function.
DLNA- a set of standards that allow compatible devices to transmit and receive various media content (images, music, video) over the home network, as well as display it in real time.
An ASUS laptop was used for the test. Setting up the connection is quite simple. The laptop and TV must be connected to the same router in the house. Next, on the laptop, open shared access to the folder or HDD drive of the laptop. Then we select the desired file, right-click “transfer to device”, select our TV and then the broadcast will begin on the TV screen.
It was experimentally found that the maximum quality of video broadcast over a wireless network should be 1080p (FullHD) with a bitrate of no more than 20 Mb/s. Any increase in resolution or bitrate leads to lags during broadcasting.
When connecting a regular HDD via USB 2.0, you can watch content in 1080p with a bitrate of up to 35 Mb/s and up to 40 frames per second.
FORMAT COMPATIBILITY
We previously determined experimentally that the TV can handle a video stream in 1080p resolution with a bitrate of 35 Mb/s.
All videos will be recoded to match the TV resolution (1366x768 pixels). Let's leave the bitrate at 30 Mb/s, set the frame rate to 30.
AVI. There is an image, there is sound.
FLV. There is an image, there is sound.
M2TS. There is an image, there is sound.
MKV. There is an image, there is sound.
MOV. There is an image, there is sound.
MP4. There is an image, there is sound.
MPG. There is an image, there is sound.
WEBM. There is a picture, but there is no sound.
WMV. No picture, no sound.
We can say that the built-in media player is quite versatile. All major video file formats can be played, and on a TV this is one of the most important factors. In addition, you can turn on/off subtitles and change audio tracks. A pleasant surprise was the ability to start watching a movie from where it stopped, even if you remove the HDD from the TV.
Large video files, namely Blu-ray rips up to 10 GB, are played back without problems. But files of 30 GB or more are no longer possible for this TV.
What about support for audio formats?
Formats such as: AAC, M4A, MP3, OGG, WAV, WMA are played back without problems. As expected, only the FLAC format was not played on the TV.
SMART-TV
As the owner of a SMART-TV on Android OS, I did not expect such functionality from THOMSON. But when I moved on to this section on the TV, I immediately wanted to look into the face of the one who called THIS - SMART-TV.
Two questions immediately arose...
1.What guided the developer when compiling the SMART-TV section.
2. What is the reason for such love for the YouTube service?
But let's take it in order...
The initial section of SMART-TV greets us with this menu. The first item is “recommended”. What are these recommendations related to? Nobody knows this. All recommendations are on YouTube.

Maybe the “video” section contains something useful? But no, all windows are links to YouTube channels.

For sports fans there is such a non-trivial section as “sports”. But even here, all the links go to a set of videos on YouTube or to a few live channels. Everything is in English.

The “TV” section is used to select TV operating modes.

Finally, we come to the “applications” section. Pay attention to the selection of installed applications. The most useful app on this list, you won't believe it, is YouTube. The rest of the applications are in English (we are in Russia, if anything) and without any logic in presentation or layout. Naturally, you cannot group or delete applications.


For example, some applications from the SMART-TV section simply do not work. Resetting the TV doesn't help.


Or maybe there is something useful in the “TV4 AppStore” section? Let's figure out how THIS is an application store. I’ll say right away that you can’t download applications, you just launch them and that’s it. Previously launched applications can be found in the “history” section.

The so-called application store is divided into the following sections:
1.Home.
5.News.
6.Entertainment.
8.Service.
Home. An incomprehensible selection of applications in English. For example, in one of the applications you can see half-naked men in bed and ladies sitting on the toilet. If we launch such an application, we will be shown pre-recorded videos with a third-person conversation. There is no benefit from such applications.

Sport. A selection of previously recorded videos on sports topics. Naturally, everything is in English.

Music. A selection of paid music services in English, but there is one section with Russian music.

Movie. A useless selection of online cinemas, but there are a couple of “ours”. One of the cinemas offered me to watch purely Chinese films for money, a good try, but no!


News. There are a lot of news channels in English, many of which are recorded. And only the “liberal” Rain speaks on the great and mighty.

Entertainment. This section completely duplicates the “cinema” section. What's the logic? I don't have an answer.

Games. A set of primitive games that run in a separate window. Control using navigation keys on the remote control. It's not interesting to play, everything works with jerks, there is no gameplay as such.


Service. A set of useless business applications in English.

But I still managed to find one interesting application, “CineTrailer”. Through this application you can watch trailers for films that have not yet been released.

Subsections: education, top, movies, games - redirect you to YouTube channels. Just some kind of mania with this video service.
 |  |  |  |
What about a browser for surfing the web? There is one and it’s called “T-Browser”. The first thing that comes to mind is “T-Virus” from the game Resident Evil, where this virus killed people and turned them into zombies. "T-Browser" also kills people and turns them into zombies, kills because of its VERY slow work. It is simply impossible to use this “browser”; its speed is VERY low. Pages take a few minutes to load, and it doesn’t matter what speed your Internet connection is or what site you’re trying to open. The reader may ask, what about connecting the TV to the network via cable? I connected it, nothing changes. There are no questions about the operation of the Wi-Fi module, since the speed is enough to view 4k content without any problems. One gets the feeling that the hardware and software of the TV simply do not support such a “browser”. Although some kind of 4-core ARM A7 processor and Mali-450 video accelerator are responsible for the work.
There is nothing useful in such a SMART-TV. There is not even a banal weather application. No applications from Yandex (at least). No third party browsers or media players, NOTHING that would actually be useful to you when using the SMART-TV function!!!
Sorry, but I don’t have another SMART-TV for you!!!
CONCLUSIONS
First of all, it’s worth mentioning the price of this product – 16 thousand rubles, which, to put it mildly, is quite a lot.
For a lower price you can buy a TV on Android OS, which will give us almost unlimited possibilities for SMART-TV.
Of course, the TV directly performs its functions, namely watching TV shows. But the way the SMART-TV functionality is implemented is no good. Then why overpay for something that is impossible to use normally.
Honestly, I tried to find some positive arguments in favor of this TV, but they are so insignificant that they are simply invisible against the general background.
PROS:
1. Large capacity HDD support.
2. Good quality reception and display of channels on a digital antenna.
3. There are no complaints about the operation of the Wi-Fi module.
4. Excellent built-in media player.
5. Loud sound from speakers.
MINUSES:
1. There are questions about the build quality.
2. Useless SMART-TV mode.
3. Very slow browser.
4. Giant control panel.
5. No BT module.
That's all. Thank you all very much for your attention. Good luck and see you again!
Connect the receiver using an AV cable to the TV and the antenna to the receiver. Make sure you can see the receiver menu on the screen. If its menu is not displayed when the receiver is turned on, use the TV remote control to select the appropriate input (AV, HDMI, Scart). When you turn it on for the first time, simply follow the instructions on the screen. If you are not sure about something, do not change the preset settings. You can always change them later, in operation mode.
1. First select your language preference. Press the blue “Next” button on your remote control.
2. Set the desired image settings. Click Next.

3. If the antenna is active (i.e. with a built-in amplifier), turn on the antenna power. It is also advisable to enter one of the frequency channels that are used in your coverage area and adjust the antenna, achieving a high level and quality of the signal on the scale at the bottom of the screen.

4. By clicking next, wait for the channel search to finish. The names of channels will appear in a special window as they are added. The receiver is in auto search mode and scans all available frequencies. After finishing the channel search, the receiver will go into TV mode and you will see a broadcast of the first TV channel in the list (for example, “Inter”).

Manual channel search
If you haven't found all the channels available in your region, use a manual search. See the channel table to determine the nearest transmitter and frequency channel numbers. For example, you need to scan the 49th frequency channel.
1. Press the "Menu" button on the remote control and select Settings -> Channel Search.

2. Select the required frequency channel and adjust the antenna position, achieving high signal level and quality indicators. Don't forget to turn on the power to the antenna if it is active (with a built-in amplifier). Be sure to select Manual Search to scan only the frequency you want.

3. Wait until the search is completed (if it is successful, you will see a list of added channels on the screen) and exit to TV mode.

4. Make sure that all found channels are showing. If not all channels have a picture and a “Searching for Signal” message appears on the screen, try adjusting your antenna for optimal reception of all channels. Didn't achieve 100% results? Select more
Produced by our craftsmen Thomson TV setup to analog and digital channels of terrestrial, cable and satellite television, adjusting brightness, color and geometric parameters of the screen, wired or wireless connection of a Thomson TV to the Internet, connecting external playback players or recording devices.
We know how to set up a Thomson TV. Organized for your convenience.
Thomson TV connection instructions
TV connection connectors THOMSON T32D15DH-01B 1) VGA - video connection from PC
2) PC AUDIO - input for connecting audio from a PC
3) SCART - input/output for connecting video and audio from external devices
4) RF - input for connecting an terrestrial or cable antenna
5) HDMI1 (ARC) - HDMI input and output. All connections of the HDMI cable to the Thomson TV should be made with the devices turned off.
6) HDMI2
7) HDMI3
8) DIGITAL AUDIO OUTPUT COAXIAL - digital audio output connector
9) MINI AV - audio input via adapter
10) CI - connector for connecting a CAM module in CI+ format. All connections should be made with the device turned off.
11) Y Pb Pr - connection via a component or composite video signal adapter.
12) USB - connection of compatible devices with a current consumption of no more than 500 mA.
Thomson TV instructions
From Thomson TV instructions you can find out the following information:Precautions when using the device
General view of the Thomson T32D15DH TV
Remote control (RC)
Basic functions of the Thomson TV menu
Working with the menu
Trouble-shooting
Specifications
Equipment
Appearance Thomson TV remote control and description of the buttons.
MUTE- soundless. Click this button to temporarily mute the sound.
ON button- turning the TV on and off
Buttons 0...9- to select a TV channel
Info button- information about the current state
Return button- return to previous channel
Source button- selection of input signal source
Menu button- enter menu mode
Arrow buttons- menu navigation and value adjustment
ZOOM button- SELECTION of image format. Not supported in USB mode
OK button- confirmation of choice
Text button- switching teletext modes. Thomson is not supported on some TV models.
Exit button- exit the menu
Vol +\- button- volume control
TV button- TV mode selection
List button- display a list of channels. Pressing again displays a list of favorite Thomson channels
CH(P) button- switching channels. In models with teletext, also serves to turn pages
Subtitle button- selection of subtitle language for a digital channel
Guide button- selection of an electronic program guide, the function is available only for digital channels. In USB media player mode, select playback options menu
Setting up Thomson TV
Setting up Thomson TV is done by pressing the MENU button on the Thomson TV remote control. Navigate through the menu sections using the arrow keys, and when you find the section you want, press OK.
Select the desired value using the arrow keys on the control panel. Pressing the MENU button returns to the previous section, pressing the EXIT button exits the menu.
If an item in the menu is grayed out, it means that this function is not available on your TV, or it cannot be changed in the current menu or submenu.
The buttons on the TV panel have the same function as the corresponding buttons on the Thomson TV remote control.
Thomson TV picture settings menu
Choose the picture mode that suits you best. You can select a personal picture mode and adjust the parameters: Contrast, Brightness, Saturation, Hue, Sharpness, Hue, Aspect Ratio. In the Thomson TV Advanced settings submenu, you can select and configure the following parameters: Noise reduction, Dynamic contrast.
Thomson TV sound settings menu
In this section, you can select the sound settings mode that suits you. You can configure the following parameters: Low and High frequencies, Sound balance, Automatic adjustment of AGC gain, Surround sound, Equalizer, Audio description - description of what is happening on the screen for visually impaired people, Sound Type.
Thomson TV channel setup menu
The Thomson TV channel setup menu is used to select parameters, configure, and edit all television channels.
Connection type - allows you to select a connection via an antenna or to a cable network.
Auto search option allows you to search, find and save all available channels.
Manual search - this option allows you to start a manual search from the current frequency.
Channel editor - this option allows you to: delete, move or skip found channels. For channel operations, use the colored keys on the remote control.
CI+ interface - option displays information about the connected expansion module.
Signal information - this option shows information about the digital channel.
Some of the above features are only available in Digital TV (DTV) mode.
Answers to questions on Thomson TV
Please help me set up the channels yourself, Thomson 21MG10KG TV?
Hello! The TV is 35 years old. I wanted to handle adding channels in the settings myself, I messed up the channel settings, there is no sound, although the sound is on, the video in some places on the channels shows both bad and good. There is no sound, it wheezes, hisses, I can’t handle it myself. There is a remote control, but not from this brand, I bought it additionally, like from Thomson RCT-100(is). Please help me set up the channels yourself if you have instructions for this brand. 10/06/2018, Kurgan, Tyumen region.
To set up channels on the TV, you need to enter the setup menu by pressing the Menu button on the remote control 3 times, and then select the correct sound system from those offered. Perhaps your original remote control does not allow you to enter the setup menu. The sound wheezes or hisses - perhaps the sound system is not set correctly. Setup instructions (in English) are available on our website.
Thomson 21MG10KG User Manual?
Where can I find the instructions for the Thomson 21MG10KG TV? Moscow region.
It is not easy to find instructions for the old Thomson 21MG10KG model. But you can understand the basics of its operation by finding the user manual from another CRT TV of the same brand. For a line of one manufacturer, the difference in operation of different models is insignificant.